
The WLabs Smart Oven
This post is sponsored by WLabs - all opinions are my own.
I am so excited to share with all of you my new favorite kitchen appliance, the WLabs™ Smart Oven. As I’ve said here before, it takes a lot for me to want to buy a new appliance or kitchen tool. Nine times out of ten, I prefer using my chef’s knife to the new gadget that cuts a mango from its pit, or to use my blender over a tool that’s only purpose is to crush ice. For me to get on board, it has to be high-functioning, multi-purpose, and worth my kitchen real estate.
So, when I first learned about the WLabs™ Smart Oven, I had to put it to the test. Let me tell you, I went from skeptical to obsessed. It has 11 different cooking modes, including air fry, bake, dehydrate, slow cook and toast, and it even recognizes the food you put inside. (I put bacon in it yesterday morning and sure enough, the screen popped up “bacon,” then I selected “extra crispy,” and it went to work.) For being relatively compact for what it can accomplish, it’s surprisingly big enough to hold a whole chicken or a 12-inch pizza, so I feel like I have gained a second oven.


I recently hosted a WLabs Supper Club dinner party in Los Angeles to introduce the oven to a group of influencers and everyone had the same reaction as I did.
I served honeydew margaritas and used the dehydrate feature to make a dehydrated lime slice to use as garnish. It takes about five hours to dehydrate, so I like to put it on before I go to bed. The oven shuts off automatically, so I wake up and the job is done.


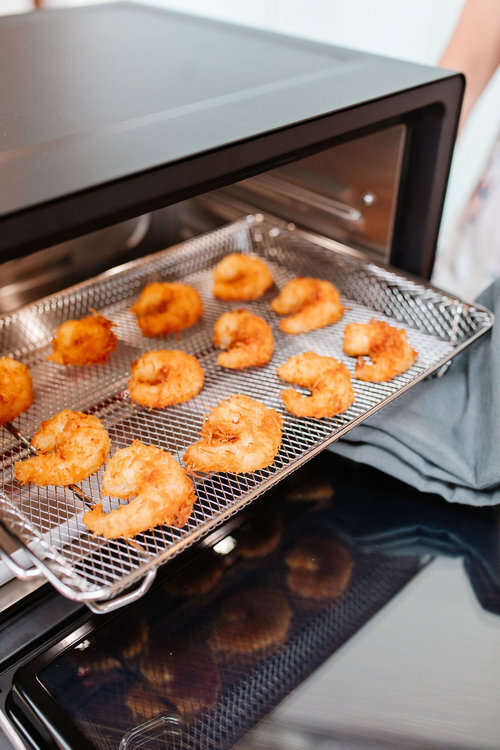
I love fried food but it’s obviously not the healthiest of options and when making it for a dinner party, it is messy and time-consuming. I used the air fry option to make my coconut shrimp and no one could tell the difference! Super crispy and tasty.
For the main course, I made my Sticky Honey-Chili Garlic Chicken with Cucumber Salad, using the bake feature. The oven has a thermometer that you stick directly in any meat you’re cooking to ensure that the oven is cooking based on the internal temperature versus the temperature of the oven. Say goodbye to dry, over-cooked chicken!
Another VERY handy feature to aid you in your cooking adventures is the Live Look In* feature, which is available via the Whirlpool App, for those of us who can’t resist checking in on our dinner but need to tackle other things around the house! The oven has a camera that allows you to see how your food is progressing via your mobile device! This is the best because you can resist opening up your oven door and letting all the heat out. The app also will alert you when your meal is done. Yes, I know. Genius!!
There are only 2,000 of these ovens being sold, so be sure to pre-order yours now here (they officially launch this fall!
Sticky Honey-Chili Garlic Grilled Chicken with Cucumber Salad


Sticky Honey-Chili Garlic Grilled Chicken with Cucumber Salad

Prep time: 4 hrs, 30 min
Cook time: 20 min
Total time: 4 hrs, 50 min
Yield: 99
Ingredients
For the Chicken :
- 1/2 cup chili garlic sauce
- 1/2 cup honey
- 1/2 cup rice vinegar
- 2 tablespoons sugar
- 2 tablespoons soy sauce
- 2 cloves garlic, grated
- 1 tablespoon cornstarch
- Kosher salt and freshly ground black pepper
- One 3-4 pound chicken, cut into pieces
- 1 tablespoon minced fresh cilantro
Cucumber Salad :
- 3 tablespoons rice vinegar
- 1 tablespoon honey
- 4 Persian cucumbers, cut in half lengthwise and sliced
- 1 tablespoon minced fresh cilantro
- Kosher salt and freshly ground black pepper
Cooking Directions
- In a small saucepan, combine the chili garlic sauce, honey, rice vinegar, sugar, soy sauce and garlic. Bring to a low simmer over medium heat. Reduce the heat to low and cook about 10 minutes. Spoon 1/4 cup of the mixture into a small bowl, whisk in the cornstarch until combined and then whisk back into the saucepan. Let simmer an additional 10 minutes to thicken. Let cool completely.
- Salt and pepper both sides of the chicken and place on the 16” x 12” baking tray (or your own pan that fits within the smart oven). Pour half of the chili garlic mixture over the chicken and toss to coat; reserve the remaining sauce. Cover with aluminum foil and refrigerate for 4 hours.
- Place the chicken uncovered in the WLabs™ Smart Oven and stick the thermometer directly into the middle breast. From there, the oven will work its magic. A menu will light up on the right-hand screen and the auto food recognition technology will automatically recognize the chicken. The camera and infrared system will detect what type of food you’ve placed inside, it’s starting temperature and whether it’s fresh or frozen (in our case, fresh!).
- Next, click “start.” It should take approximately 20 minutes to cook the chicken.
- Meanwhile, preheat the grill to medium high.
- Remove the chicken from the oven and grill, basting with the reserved sauce, until the skin is crispy, a few minutes per side. (Alternatively, the chicken can be finished under the broiler. Place the chicken back in the oven and hit “broil”. You will be alerted when the oven is finished broiling (you want the skin to be crispy).
- Transfer the chicken to a serving platter, spoon the remaining reserved sauce over the top and garnish with cilantro. Serve with the Cucumber Salad.
- Cucumber Salad: In a medium bowl, whisk the vinegar and honey until emulsified. Add the cucumbers and cilantro and toss to coat. Season with salt and pepper. Refrigerate until serving time.
Coconut Shrimp


Coconut Shrimp

Prep time: 30 min
Cook time: 6-8 min
Total time: 40 min
Yield: 99
Ingredients
- 24 large shrimp, peeled and deveined with tail left on
- Salt and pepper
- 1/2 cup cornstarch
- 3 egg whites, beaten until slightly foamy
- 2 cups flaked cocunut
- Canola oil
- 1/2 cup Orange marmalade
Cooking Directions
- Season shrimp with salt and pepper. Toss shrimp in cornstarch to coat, then dip in egg whites and dredge in coconut, pressing the coconut onto the shrimp.
- Place the shrimp directly into the air-frying basket and into the oven. You’ll then hit “manual mode” and select “air fry” from the drop-down list. Since you’ve selected “manual mode”, you’ll then be prompted to set the temperature and length of time you’d like them cooked. This mode is great when you’re following a specific recipe. In this case, set the temperature for 400 degrees F and set the time for 6-8 minutes before clicking “start.” Behind the scenes, you have an algorithm that is cooking the shrimp just how you like them – the air frying feature and basket also allows you to recreate the shrimp without using a lot of oil, which is another great benefit.
- If your oven is connected to your Wi-Fi* you will receive a notification on your phone when the food is done. Remove the shrimp from the oven and place in a serving dish as a passed appetizer. *Appliance must be set to Remote Enable. Wi-Fi & App Required.
Honeydew Margaritas


Honeydew Margaritas

Prep time: 10 min
Cook time: 6 hrs
Total time: 6 hrs, 10 min
Yield: 2 servings
Ingredients
- 1/4 whole honeydew, seeded, peeled and cut into chunks (about 2 cups/340 grams)
- 3 tablespoons fresh lime juice
- 1 tablespoon orange liqueur, such as Cointreau
- 1/2 cup (120 ml) silver tequila
- 1 teaspoon light agave syrup
- 1 teaspoon sugar
- 1/2 teaspoon coarse salt
- 1/2 lime - cut into thin circular slices or wheels to garnish
Cooking Directions
- Begin by placing the limes on the roasting rack that rests inside the baking tray and place them in the smart oven. Click “manual mode.” Upon placing the fruit in the oven, the menu will light up and populate with the variety of cooking modes – select dehydrate if you’re making this cocktail at home or another cocktail that requires dehydrating fruit. I love this feature of the oven as it elevates the standard cocktail and there is NO work involved.
- Set the temperature at roughly 135 degrees F and the cooking time for approximately six hours (so make sure you plan ahead and throw them in early in the day or the evening before).
